How To Setup And Use Your Ledger Nano S With Ledger Live
How To Setup And Use Your Ledger Nano S With Ledger Live

With over 1 million units sold worldwide, the Ledger Nano S is the most popular hardware wallet. The device is praised for its security and its support for a wide variety of coins. If you do not already own one,
This guide provides complete step by step instructions on how to setup a new Ledger Nano S hardware wallet, using the Ledger Live application.
Ledger Live is the official desktop application from Ledger that acts as an interface with the Ledger Nano S hardware wallet. Your private key, which is used to retrieve all of your cryptoassets from the blockchain, still will be stored safely offline in the Ledger Nano S.
If you do not yet own any cryptocurrency or cryptoassets, you can purchase them on popular, safe, and easy to use exchanges such as Coinbase or Gemini.
Ledger Live is only the interface that lets you send and receive transactions, setup accounts and view your balances on a Ledger wallet.
Download and install Ledger Live
- Go to https://www.ledger.com/pages/ledger-live.
- Click on “Download" and choose whether you want the Desktop or Mobile app.
- Open the application and install it on your computer.
- The installation should not take more than a few minutes and when it is completed, you should see the Ledger Live icon on your desktop. The icon is a white circle with two blue curved lines.

Create a 4-8 digit PIN code
- Double click the icon to open Ledger Live.
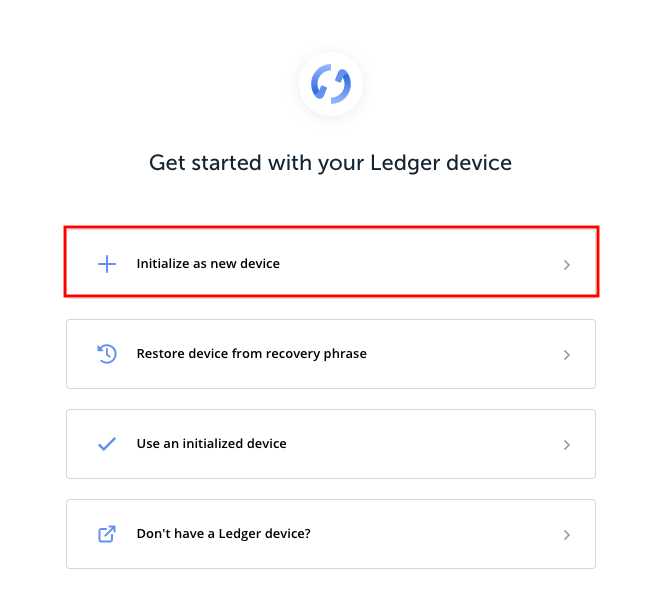
- You will see a screen that shows: “Get started with your Ledger device.” Choose the first option, “Initialize as new device.” Then select the Ledger Nano S and click “Continue.”
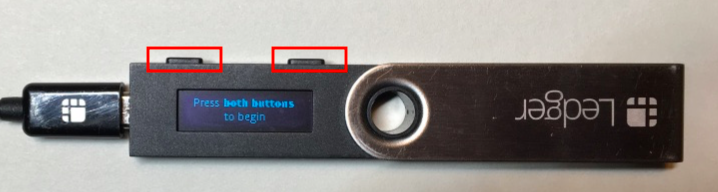
- Now the screen will show: “Choose Your Pin Code.” Connect the Ledger Nano S via the USB cord to your computer. On the Ledger Nano S, pressing both buttons at the same time acts as a “Select” or “Continue.” When we say “Press both buttons” we mean press both buttons of the Ledger Nano S at the same time.
- Press both buttons now to begin.
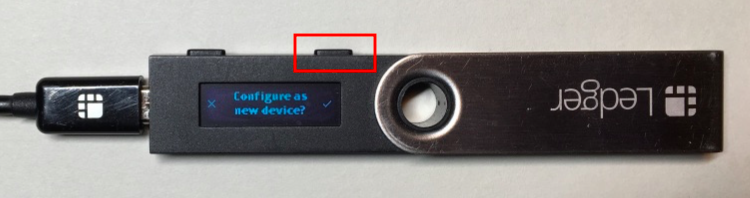
- When the screen on the Ledger Nano S reads “Configure as new device,” press (only) the right button to select this option.
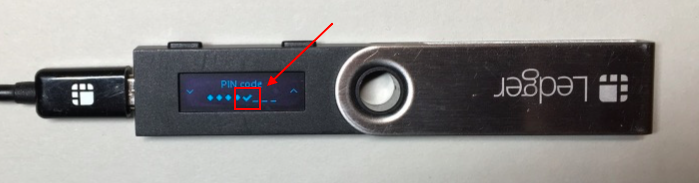
- Press both buttons to “Choose a PIN code.” The PIN code is between four and eight digits long and it protects your assets in case someone else gets a hold of your Ledger device. Make sure to remember or write down your PIN code.
- Use the left and right buttons to scroll through the digits. When you reach the number you want as the first digit, press both buttons to select it. Do the same for the rest of the digits.
- If you want a PIN code that is less than eight digits, then scroll down to the checkmark after your last digit and then press both buttons to confirm. To delete a digit, scroll down to the “x” and then press both buttons.
- The Ledger Nano S screen will ask you to “Confirm your PIN code.” Press both buttons and reenter your pin.
Write down your recovery phrase (word seed)
- The Ledger Nano S screen will show: “Write down your recovery phrase.” This is the most important step. The Ledger device will generate a 24 word recovery phrase that you will copy on paper in its entirety. This recovery phrase, also called a “word seed” is a representation of a “Master key” that is used to access and own all of your cryptoassets.
- All of your cryptoassets are actually stored on the blockchain and not on a hardware or software wallet. The word seed acts as a key that allows you to access and claim ownership of these cryptoassets. Whoever has the word seed will be able to control all of your cryptoassets that correspond to that word seed.
- NEVER take a picture of the word seed, never type the word seed into a computer or a mobile device, and never enter the word seed into any device that is connected online. The security of your Ledger Nano S depends on you keeping the word seed entirely offline.
- Furthermore, if your Ledger Nano S gets lost, stolen, damaged or reset, you will be able to recover access to all of your cryptoassets as long as you have the word seed. The word seed comes from a standardized list known as BIP39. This means that you can recover all of your cryptoassets by entering the word seed into another Ledger Nano S, another hardware wallet such as a Trezor, or even a software wallet such as Electrum or Abra
- We recommend you write down the word seed twice on two different sheets of paper and then store each of these copies in a secure and hidden location.
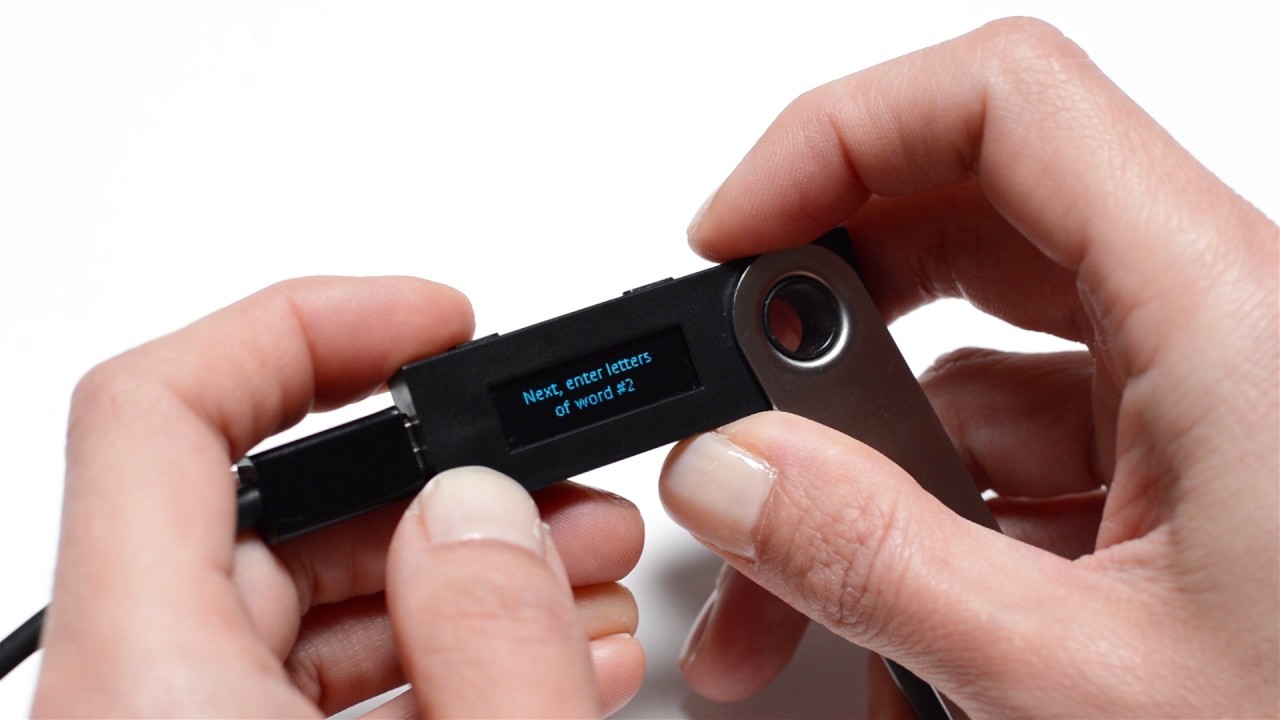
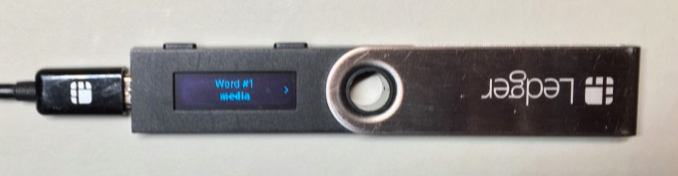
- The Ledger Nano S screen will show “Word #1” and the 1rst word. Copy this word on paper with its place, #1, and then press the right button to go to the next word. Do this for all 24 words. Make sure to take your time and be careful with this process. Every word needs to be copied down exactly and in the right order. In the step right after this, you will confirm each word on the Ledger Nano S.
- There is additional and optional confirmation that you can do, once you sign in to Ledger Live. This is called a “recovery check” where you will reenter the entire word seed to confirm that you copied it down correctly. We recommend this, because even if just one letter is off, you will not be able to use your word seed to recover or access your cryptoassets.
- When you get to the last word, press both buttons; then press both buttons again to “Confirm your recovery phrase.”
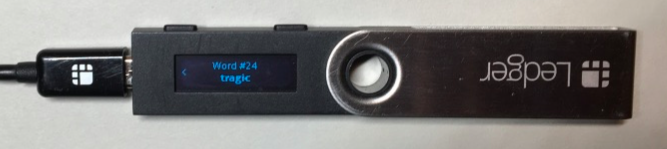
- The Ledger Nano S screen will state “Confirm word #1.” Use the left and right buttons to scroll through the words, until you reach the correct word that is #1. Then press both buttons to confirm word #1. Do this for all 24 words.
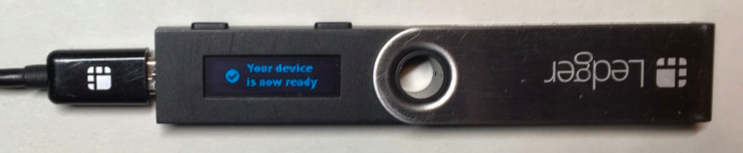
- Once you are done, the Ledger Nano S screen will state “Your device is now ready.” When you click past this, you will see “Settings” with a gear icon.
- Now, go back to the Ledger Live desktop application on your computer and click “Continue.”
- Click “Continue” again, because you have already copied down the 24 word seed.
Connect to Ledger Manager
- Go through the security checklist and when you reach “Is your device genuine?” click “Check now.

- A screen will pop up that shows “Connect and unlock your Ledger device” and a loading symbol will be spinning.” Under this message, it will show “Navigate to the dashboard app on your device.” The “dashboard app” is just where the Ledger Nano S shows “Settings.” So make sure you are in Settings.
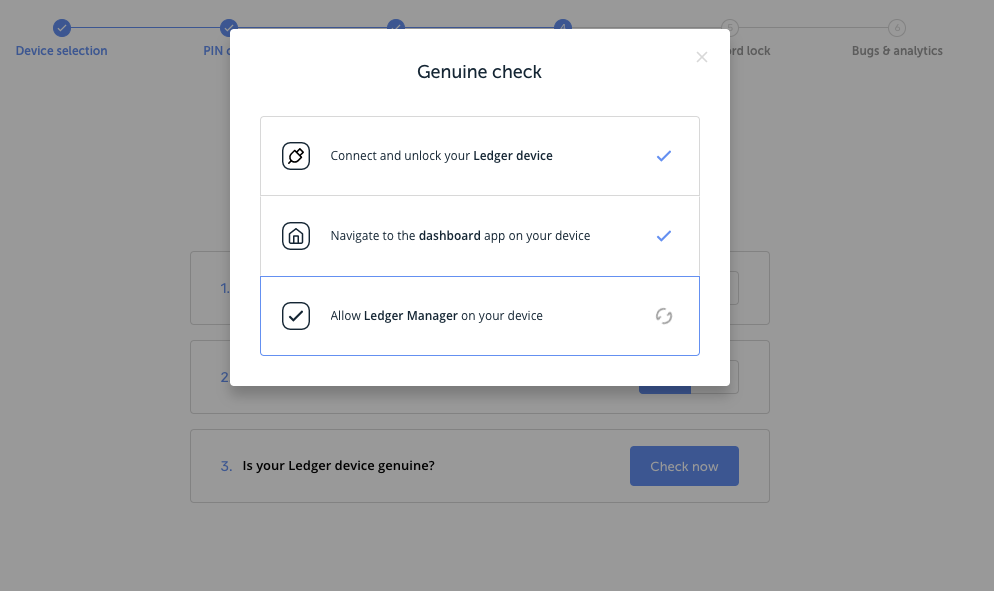
- If the loading screen gets stuck on “Connect and unlock your Ledger device” just close out of Ledger Live, make sure all other applications on your computer are closed, and then reopen Ledger Live. Click “Initialize as new device” and then keep clicking “Continue” until you are where you left off. Try again to do the “genuine check.” If you still get stuck on, “Connect and unlock your Ledger device,” unplug the Ledger Nano S, plug it back in, reenter your pin and try again. If that still does not work, then try a different USB port.
- When the message on the screen moves to “Navigate to the dashboard app on your device,” and then “Allow Ledger Manager on your device” that means you are successfully connecting. When “Allow Ledger Manager on your device” is loading in Ledger Live, then your Ledger Nano will also show “Allow Ledger manager.” Press both buttons on the Ledger Nano S.
- Now click “Continue” on Ledger Live.
- You will be given the option on Ledger Live to create a password. This is optional, so either create a password and click “Continue” or click “Skip this step.”
- On the “Bugs and analytics page” select your preferred options and then click “Continue.”
- Ledger Live will now show “Your device is ready.” Click “Open Ledger Live.”
- Click on “Open Manager.” You may have to click the right button on the Ledger Nano S again if “Allow Ledger Manager” appears on the device’s screen. If you get stuck on “Connect and unlock your Ledger device” then try the same solution as before: close out of Ledger Live, reopen it, and navigate to where you left off.
Firmware Update
- Ledger recommends doing the firmware update before you start using your device.
- When you are in the Manager section in Ledger Live, there will be a notification in the white bar, right above the App catalog if a firmware update is available. If there is no notification, then you have the latest firmware version.

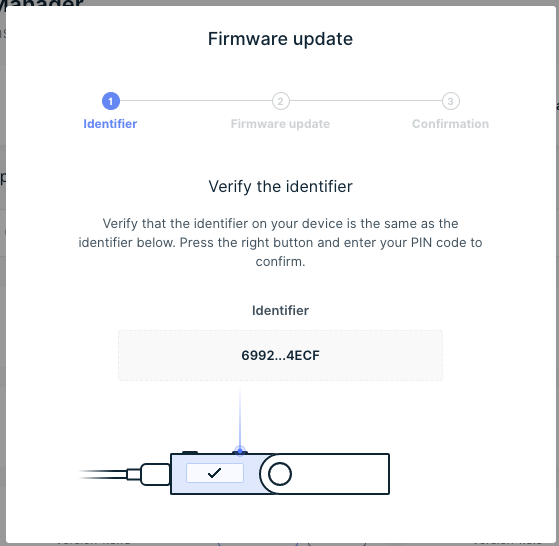
- Click on “Update."
- Check that the first and last 4 characters of the Identifier shown in Ledger Live are the same as those on your Ledger Nano S.
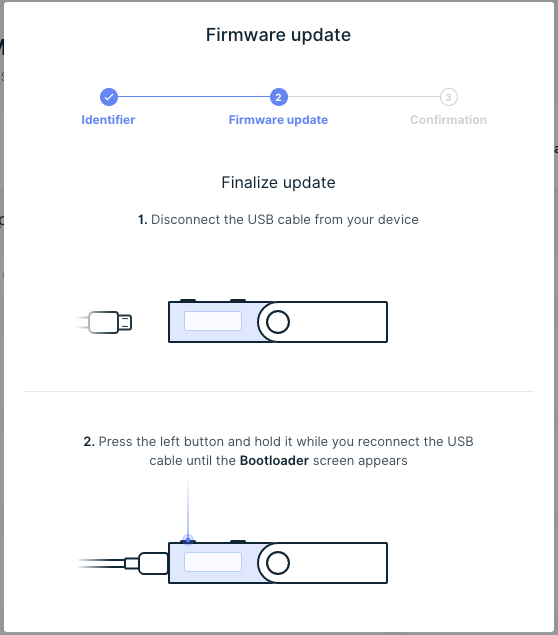
- You will be prompted to disconnect and reconnect the USB cable.
- Press the left button on your device and hold it while you reconnect the USB cable.
- Release the button once “Bootloader” is displayed. The Bootloader, MCU and Firmware will start to update.
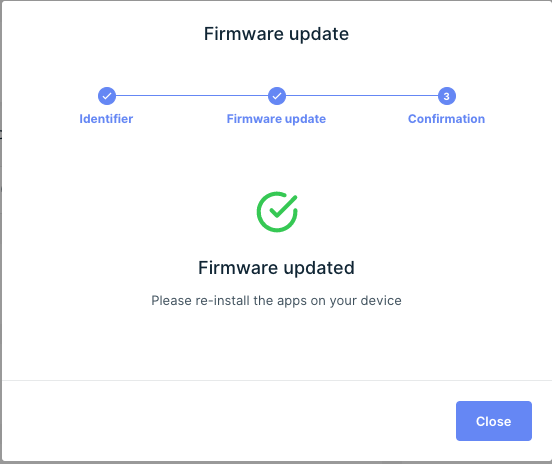
- Once this is finished there will be a confirmation page and you can click "close."
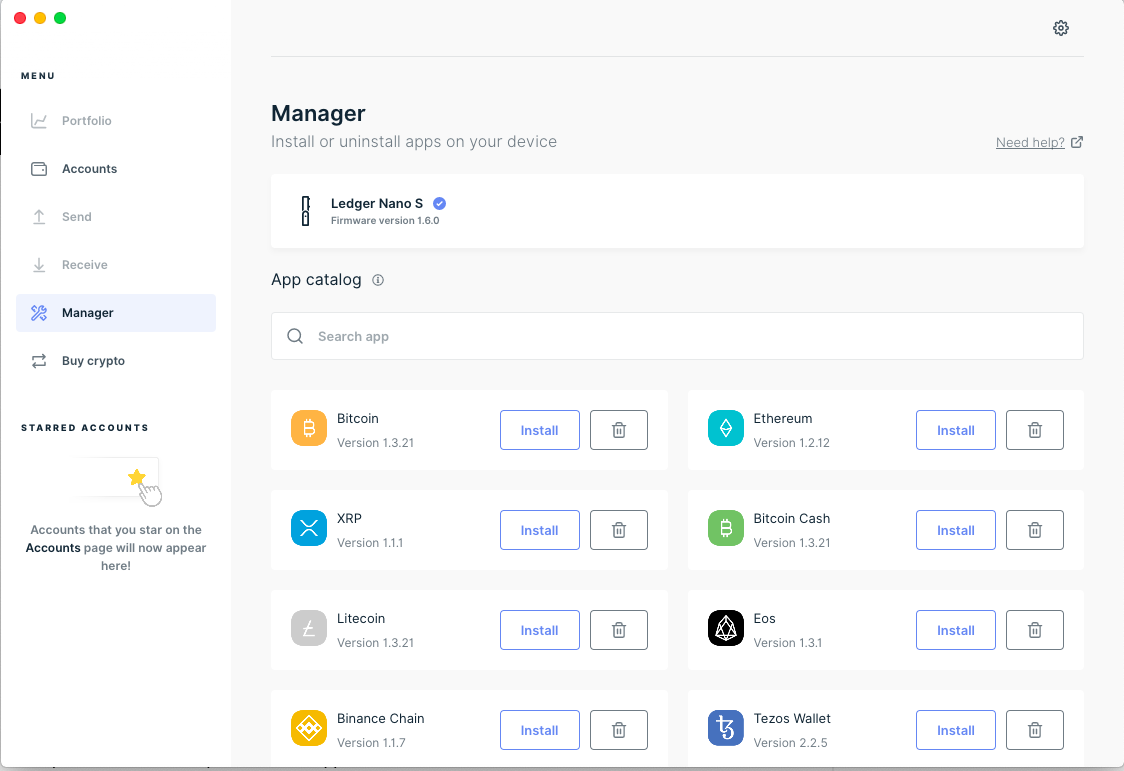
Installing Apps
- You are now ready to install apps on your Ledger Nano S. Install the apps that correspond to the coins or tokens that you want to store on your Ledger Nano S.
- You may need to install the Bitcoin app first because the following apps require that you have the Bitcoin app installed: Bitcoin Cash, Bitcoin Gold, Bitcoin Private, Bitcoin testnet, Dash, Digibyte, Dogecoin, Hcash, Komodo, Litecoin, PivX, Peercoin, PosW, Qtum, Stealth, Stratis, Vertcoin, Viacoin, Zcash, ZenCash.
- You can also search for a coin/token in the App catalog.
- To install an App onto your Ledger device, click the “Install” button next to that app in Ledger Live. The Ledger device’s screen will show “processing” and then the app icon will appear on the device’s screen, next to the settings icon. After the app is done installing, you will be asked if you want to "add an account." You can do this step now, or you can click "close" if you want to install more apps and add accounts later.
- Press the left and right buttons to scroll though the various apps on your Ledger device.
- To remove the app, click the trash can next to “Install.” The Ledger Nano S has a limit to the amount of different apps that it can store at the same time. However, when you uninstall an app, this has no effect on the actual cryptoassets that correspond to the word seed. Remember that your actual cryptoassets are on the blockchain and the word seed is what gives you ownership of them. So you may uninstall and reinstall apps whenever you need to manage space on your device.
- To select an app on your Ledger Nano S, scroll to it using the left or right button. Then press both buttons. The Ledger Nano S screen will now show “Application is ready.” This means that you have successfully selected the app.
- To quit out of this app, press the right button three times, and the device’s screen will than state “Quit app.” Press both buttons and you will be returned to the dashboard.
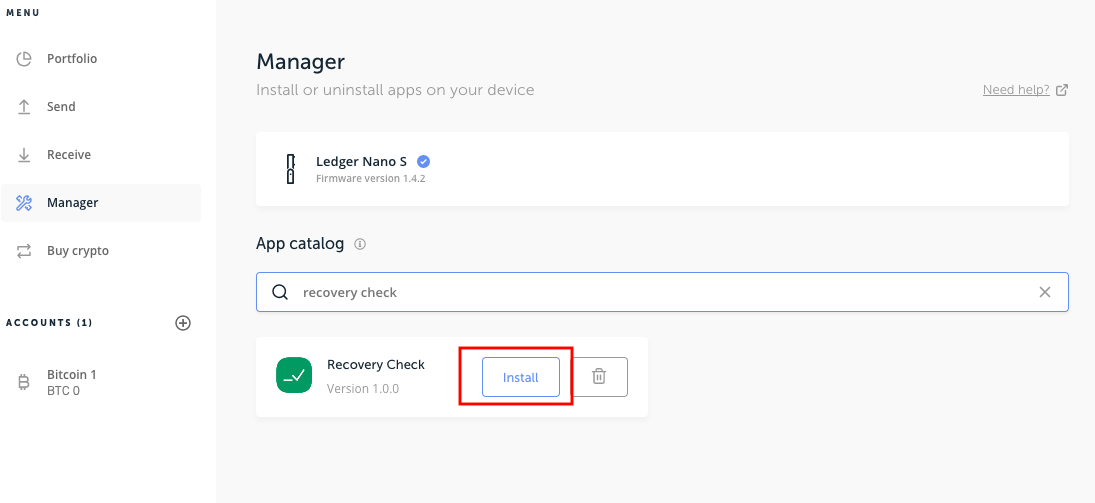
Recovery Check
- As we mentioned earlier, there is an option to do an additional recovery check to make sure you copied down the word seed correctly. This process can be tedious, as you have to select each letter of the whole word seed with only the two buttons. However, once you complete this process you will be totally sure that you have copied down the word seed correctly.
- The recovery check is in the app catalog with all the apps for the various coins/tokens. If you would like to do the recovery check then type in “recovery check” under the “app catalog” and install the app on the Ledger device. Then scroll to the app on your device and press both buttons to select it. The Ledger Nano will then take you through the steps to confirm your word seed.
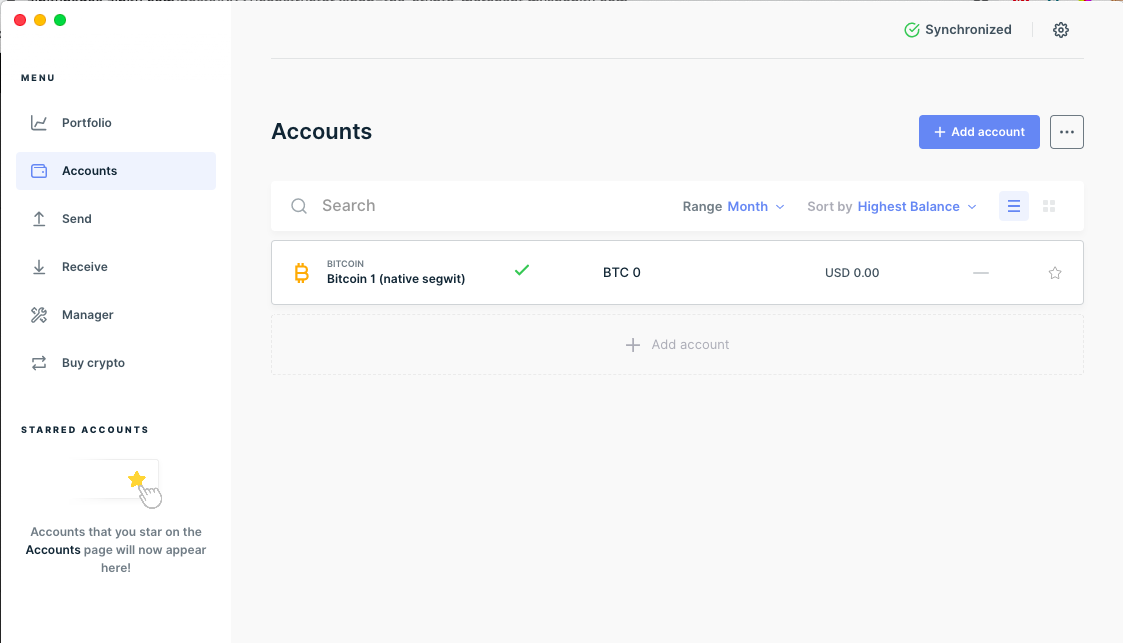
Set up accounts
- For every cryptoasset that you use with Ledger Live, you will need to create at least one account. If you want, you can create multiple accounts for a cryptoasset and rename them as you like. For example, you could create a Bitcoin spending account and a Bitcoin savings account.
- Once you have installed the cryptoasset apps on the Ledger Nano S, you are now ready to setup accounts and send and receive transactions.
- To setup an account, make sure you are logged in and connected to Ledger Live.
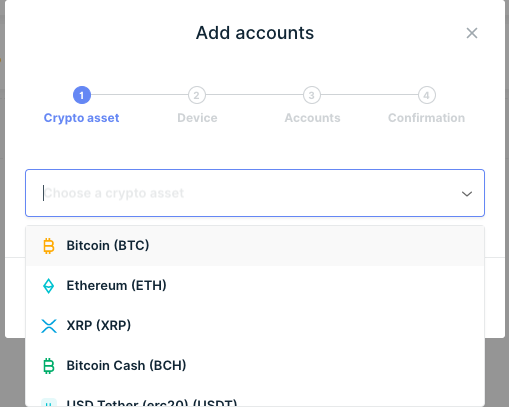
- Click on "Accounts" in the left side Menu of Ledger Live and then "Add account."
- From the drop down menu in Ledger Live, select a cryptoasset that you have installed on your Ledger Nano S and click “Continue.” Note: if the cryptoasset that you have installed is not listed in the drop down menu, then you will need to use a third party app to access this coin instead of Ledger Live. For example; for ERC20 tokens you need to use MyEtherWallet, for Stellar you need to use Stellar Account Viewer, and for Factom you need to use MyFactomWallet.
Receive cryptoassets onto you Ledger Nano S
- You are now ready to transfer your cryptoassets onto your Ledger Nano S. We recommend first trying to transfer a small amount of cryptoassets to your Ledger Nano S to make sure you understand the process.
- Click on “Receive,” under the Menu in Ledger Live.
- Select the account that you want to send your assets to.
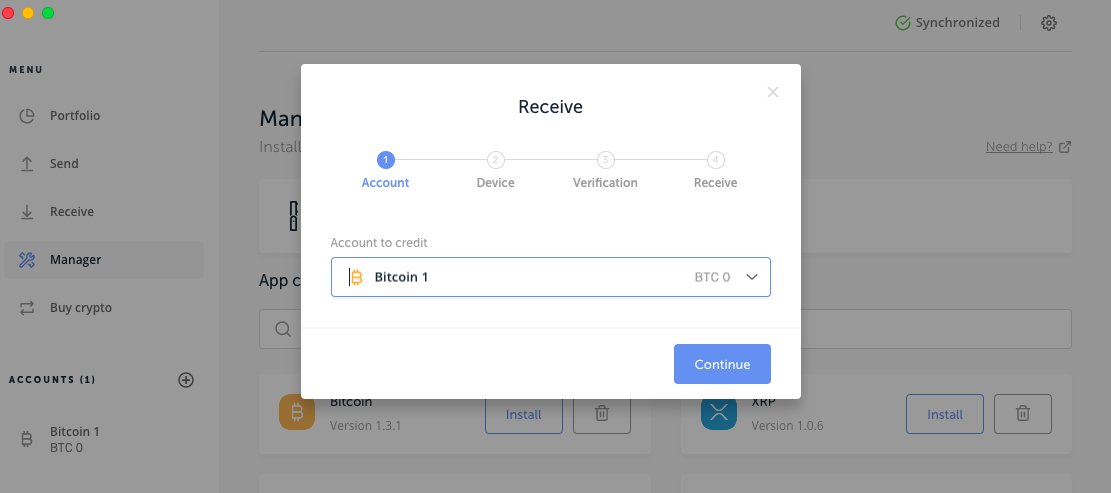
- On your Ledger Nano S, select the cryptoasset that you are receiving.
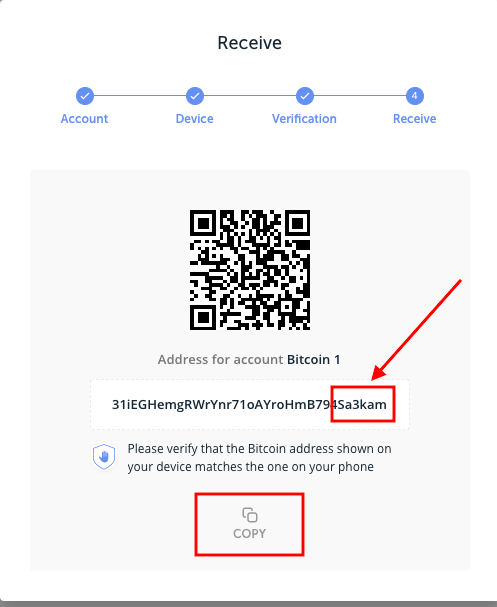
- When you click “Verify” in Ledger Live, the public address will be displayed on your Ledger Nano S screen. Make sure the address on the Ledger Nano S matches the address on Ledger Live. Press the right button on the Ledger Nano S to go through the whole address and then press both buttons when the device's screen says "approve."
- You can now copy and paste the public address listed on Ledger Live. Click on “Copy” or use the QR code.
- Paste this address into the wallet or exchange that your cryptoassets are currently being stored. For example if your cryptoassets are on Binance and you want to send them to your Ledger Nano S, you would login to Binance, go to “withdrawal” and then copy this public address from Ledger Live into Binance and click send.
- When the balance is updated in Ledger Live, then the transaction has been completed. Transactions vary in how long they take, depending on the cryptoasset and the speed of their blockchain.
Send cryptoassets from your Ledger Nano S
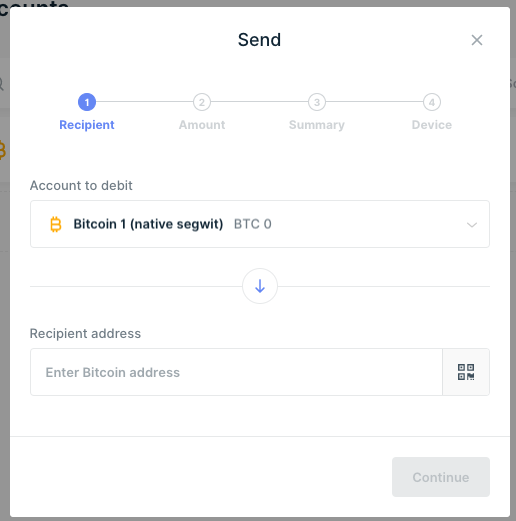
- To send cryptoassets from your Ledger Nano S to another wallet, click on “Send” on the left side of Ledger Live, under the Menu section.
- Select the account that you are sending cryptoassets from.
- In the “Recipient address,” copy and paste the public address from the wallet that you are sending cryptoassets to.
- You will then be able to click "continue" and select the amount and verify the transaction before sending it.
Congratulations! You now know how to setup your Ledger Nano S with Ledger Live and send and receive transactions. As long as you protect your word seed and your Ledger Nano S physical device, then you can rest easily knowing your cryptoassets are being stored by the most secure method.


Comments
Post a Comment